Showing posts with label h and m. Show all posts

August 23, 2013

DIY Friday: distressed & studded sweatshirt

So I'm liking the rocker feel lately... And this is the perfect example too.  It's edgy but you can balance it by pairing it with feminine items. Say, a flowy skirt or wideleg floral pants or printed haram-esque pants. Also a body con pencil skirt would work too! 

This is the perfect DIY if, you too like the Edgy look.

What you'll need:
Studs (I bought mine at hobby lobby in the leather making area)
Raglan sleeve Sweatshirt (again I bought this at H&M in the men's section)
Sandpaper 
Scissors 

1. (This was me trying to lay the sweatshirt out flat. Thank you Graycie!)
You'll want to lay the sweatshirt out flat. Minus the dog.


2. Lay you studs out.


3. Grab one of the shoulders of the sweatshirt & grab one stud. And place the stud over the the raglan seam on shoulder on the front of shoulder.


4. Poke the stud the through the sweatshirt. Once it's gone through, use your scissors to bends the tines, as if the stud & tines are hugging the sweatshirt.


5. Repeat this process until you reach the armpit seam. (I did not run it around the whole arm, just the front.) 


Then repeat to the out her side: 

6.Next, use your scissors to cut holes in the ribbing on the hip, arm cuffs & neckline. Sizes of holes should vary. Start stretching the holes. 


7. Use your sandpaper on the holes you just cut. 

8. Stretch out the ribbing and sweatshirt as much as possible. You want a worn in feel. 

9. Then I slit the hip ribbing on sides and stretched those aswell. Then I sandpapered them. 
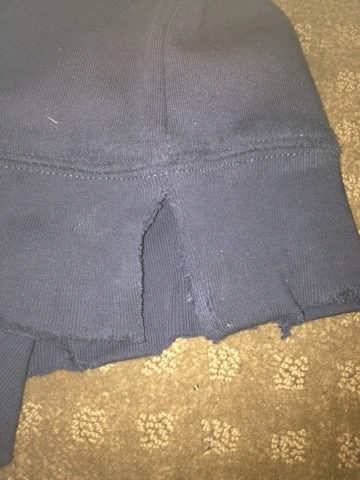
10. I Will warn you, once you use the sandpaper, the sandpaper will great holes, so don't freak out if you have more holes. It just adds more character to your sweatshirt. 

Now for the styling: I see a black bodycon pencil skirt, with an off-white chiffon collared shirt, this navy sweatshirt and black pointy toed flats or heels & a brightly colored cross body bag in pink or highlighter yellow. 

So, here ya are! I hope you try this DIY! Happy Friday! -Ryn

March 15, 2013

DIY Friday: Graphic Print Tee

OK so if you follow me on Intstagram: @RynB then you've probably seen my pictures of the graphic tee I made... Yes you read that right! I made it... And you can too!

It's so easy! Here are the things you need to gather & need:
T-Shirt ( I got one from the men's section at H&M,  www.HM.com, $5.95)
Jacquard Paint (www.DharmaTrading.com has a great price for them!)
Stamp of your choice (I really like the clear acrylic ones with the clear acrylic block. easy to use & clean! I bought mine from Joann's, www.Joann.com)
1'' foam paint brush
Paper plate
And a clean space
Iron

1.So first things first, You'll want to clear the space you are going to be working in, then place your shirt there flat, no wrinkles please. No need to separate the layers, it shouldn't bleed onto the other side. (if it does, then your tee will have character.)

2. Pour out some paint on the paper plate, Then you'll want to load the paintbrush up with paint, just the tip, but enough that it covers the stamp.

3.Then brush the stamp with paint, and the stamp onto the shirt. press firmly.

4. Let dry for an hour, then switch to the other side and load & stamp and then wait for another hour and do the sleeves. When completely done with shirt, slide it on a hanger & let dry for 24 hrs.

5. Turn iron on highest heat setting and iron the whole shirt for about 3-5 minutes running the iron over each place you stamped. Never stop in one position for too long. (We don't want to scorch it!) You're wanting to set the paint so it won't wash off in the washer (and no, you can't dry it in the dryer to set it, it has to be the iron)

6. And then you are good to go! You have a graphic anthro looking Tee! : )


A graphic tee pairs nicely with skinnies & midi (tea-length) skirts! : )
Happy Friday & Shabbot Shalom!
-Ryn