Showing posts with label pants. Show all posts

August 23, 2013

DIY Friday: distressed & studded sweatshirt

So I'm liking the rocker feel lately... And this is the perfect example too.  It's edgy but you can balance it by pairing it with feminine items. Say, a flowy skirt or wideleg floral pants or printed haram-esque pants. Also a body con pencil skirt would work too! 

This is the perfect DIY if, you too like the Edgy look.

What you'll need:
Studs (I bought mine at hobby lobby in the leather making area)
Raglan sleeve Sweatshirt (again I bought this at H&M in the men's section)
Sandpaper 
Scissors 

1. (This was me trying to lay the sweatshirt out flat. Thank you Graycie!)
You'll want to lay the sweatshirt out flat. Minus the dog.


2. Lay you studs out.


3. Grab one of the shoulders of the sweatshirt & grab one stud. And place the stud over the the raglan seam on shoulder on the front of shoulder.


4. Poke the stud the through the sweatshirt. Once it's gone through, use your scissors to bends the tines, as if the stud & tines are hugging the sweatshirt.


5. Repeat this process until you reach the armpit seam. (I did not run it around the whole arm, just the front.) 


Then repeat to the out her side: 

6.Next, use your scissors to cut holes in the ribbing on the hip, arm cuffs & neckline. Sizes of holes should vary. Start stretching the holes. 


7. Use your sandpaper on the holes you just cut. 

8. Stretch out the ribbing and sweatshirt as much as possible. You want a worn in feel. 

9. Then I slit the hip ribbing on sides and stretched those aswell. Then I sandpapered them. 
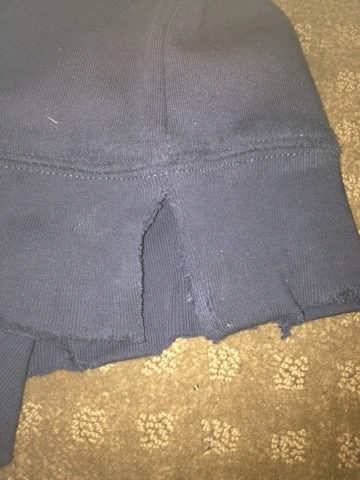
10. I Will warn you, once you use the sandpaper, the sandpaper will great holes, so don't freak out if you have more holes. It just adds more character to your sweatshirt. 

Now for the styling: I see a black bodycon pencil skirt, with an off-white chiffon collared shirt, this navy sweatshirt and black pointy toed flats or heels & a brightly colored cross body bag in pink or highlighter yellow. 

So, here ya are! I hope you try this DIY! Happy Friday! -Ryn

April 26, 2013

DIY Friday: Scalloped Shorts

I probably got this idea from Pinterest about a year ago. And I think it's so adorable! But you can totally rough up the sweet looking shorts with black or grey... It can ground the outfit for ya, add a blazer, tank & wedges (try all one color, like black, besides the shorts) or a holey t-shirt and throw on some converse... Or you can prep it up or even make it more girly! ooh or pair it with chambray with converse or ballet flats from madewell or J.crew...  The outfit is up to you, that's the great thing!

You can take some older pants you don't wear anymore or some old shorts you have hiding in your closet and transform them!

What you'll need:
Juice glass or Dixie cup
Scissors
Pencil
Pants


1. Lay out you pants, you should probably iron them, like I didn't... Just to get an accurate length.

2. Lay the legs together, make them even and as flat as possible.

3.Smooth it out, one more time & Cut them.

4. Make sure they are even by laying them out. If they aren't, trim them up.


5. Put your juice glass on the edge of the "now" shorts. and start tracing with the pencil.
6. Still keep tracing and connecting the swoops.


7.See? They're shaping up.
8. Trim where the outlines are.


8. Ta-da!!!!!!! They're done! Now if you don't like the fraying look, you can buy fray check at your local craft store and place the liquid on a q-tip and smear it on each scallop.  And viola! It's complete! And ready to be worn this summer! :)
 
Ready, set, DIY!!! Xoxo- Ryn
 
P.s. I will not be showing you how the shorts look on me, only because I'm very white and I haven't shaved my legs! So you can't see it yet! : )

April 12, 2013

DIY Friday: Polka dotted jeans


So I adore these jeans! They are sooo cute! Unfortunately I haven't made them yet, I just saw them on someone on instagram who I follow... But I'm thinking I will in the few weeks! (and yes I will post pictures!)

I'm not one to post a diy on here without testing it first, but it's been kinda busy!

Disclaimer: Polka-dots will not make you look wider on you lower half, that's just your imagination. If you style these right, you're as good as gold!
And by adding polka dots to Mom jeans will not improve or update them. You should give those suckers away! Nobody should still be wearing them. They don't flatter any figure!


(Photo Credit: @LovelybyLucy on instagram)

See! Aren't these the cutest!?

My recommendation, is to use boyfriend jeans or skinny jeans for this project.
and I also think you could use any wash. either way you are going to wind up with really cute jeans! Like Madewell1937 Cute!


So what you'll need:
Jeans: Boyfriend or skinny
Bleach Pen
Paper plate
A stamper foam brush
Latex gloves

I would a test first on a scrap of fabric first...
(Use gloves when using bleach)
1.Wash and dry the jeans, then slip a piece of waxed paper inside it to prevent bleed-through.
2.First I would go ahead and put trash bags on the surface wear you'll be bleaching, Maybe outside...
3.Lay your jeans out flat.
4. Squeeze out some bleach gel on the paper plate, load up you foam stamper and lightly stamp on you pair of jeans all over. You don't want to stamp too hard, then you will not get an accurate circle. the bleach may still bleed a bit, just warn you.
5.Let dry and flip to the other side.
And repeat.
6.wash your jeans. iron & roll 'em up. and enjoy!


So excited to try this! I have the perfect pair in mind too! : )
Let me know when you try this!

Love ya, Ryn