Showing posts with label DIY. Show all posts

December 21, 2013

Advent 23: a quick Christmas wrapping DIY

An infamous tradition growing up was pitching in the night before Christmas, my siblings and I would help my mom by wrapping eachothers presents that my parents got for each of us. And then of course, if we hadn't already wrapped our own gifts for others, we would have a wrapping fest altogether! 


This year it's a bit different because we won't be celebrating as a family until Friday, but I'm accustom to it, my dad was a pilot for all my life, and sometimes he would work on Christmas...so we would sometimes have to wait. That being said, I am hoping I get all MY wrapping done before I help mom wrap the fam's gifts! 

Here is an idea for gift tags that you can use any day of the year, but Chistmas time for sure! This is such a quick DIY. I just adore the look of chalk paint & Kraft paper! So I combined them into these super cute gift tags!!! It takes about 20 minutes! 

I would show you how I wrapping but I haven't wrapped single thing! Whoops! Will post a pic on Instagram: @RynB!


What to gather:
Kraft paper (I used kraft paper bookmarks and tore them in half.)
Chalkboard paint ( I used the color black)
Hole puncher
Chalk marker
Sponge paintbrush 

1. Get your kraft paper. Tear or cut it into 3"x2" rectangles.

2. Load your paintbrush with chalkboard paint, and swipe. Swipe a few times until you like the coverage. 

3. Let dry.

4. Use the hole punch and punch a hole at one end of the rectangle. 

5. Use the chalk pen to write the names of whom you are gifting. 
6. Tie it on your package! 
7. Give the gift! 
Plus you'll get super cute confetti you can add to a package by the whole punch! See!

See told ya! Easy peasy lemon squeezey! 
Adorable, right?!

Hope you have an amazing holiday! See you tomorrow with a great cookie recipe! ; ) 

-Ryn
*disclaimer: if you have a polished manicure, I would wear gloves while doing this project, because if not, your hands will look like this when finished...
And it may or may not wash off with scrubbing! Just an FYI!

October 31, 2013

Thankful Thursdays: schedules

I'm thankful that my schedule will be back to normal soon! I'm sorry y'all! It's been crazy busy! Also it's harder than I thought to add another day of blogging to the mix! But I have enjoyed it! 

But for the past 2 days, my days have consisted of this wittle face!
Which isn't a bad thing at all! 
She is so precious! I'm also thankful she doesn't burst into tears when she sees me anymore! Thank the Lord! 

And then I've filled my days with preparing for Funkyfinds next week!! And then I will also be adding items to my etsy shop soon too, so those of you who will not be coming to Funkyfinds can still purchase some incredible items for you & loved ones. I'll also try and post pics of the booth!

Also, I've been celebrating my friend for 16 years (time flies) as she gets married TOMORROW! wow just wow! I'm so thrilled for her and husband to be! 

So hopefully by next week I will be back on a schedule! And by the next week I should have a new DIY for ya! 

Love y'all! - Ryn

October 19, 2013

DIY Friday: orange spice coffee


Ummmm my apologies! This week has been kinda busy and I was going to write a post yesterday, Friday and it totally slipped my mind! 
 
So a DIY on Saturday is just as good right? 

I don't really like Starbucks, I know it may shock some of you, but I just don't! I don't have a standard coffee drink I order (until now), their coffee is a bit too strong for me and cream doesn't cut it! And I don't particularly like burnt coffee... But that's just my take on it! 
But, when I'm desperate, I have found a new friendly coffee which is: Orange Spice iced coffee with half & half.

Mmm so good! 
But I don't always like paying $4.00 for a grande... It's not something I splurge on regularly. 
Sooo, I decided I would try to duplicate it at home... And I mastered it on the first try! I do have to give credit to my mama, she told me to try this out and figure out a way to make it myself. 

Sorry there are no pictures! 😞

What to gather:  

Ground coffee
Coffee maker
Cinnamon 
Orange essential oil or extract
Ice
Half & half


1. Add the ground coffee to your coffee maker. (I made 6 cups, so I could have left overs for days)

2. Add the cinnamon to your ground coffee and stir around. (I added 2 tablespoons)

3. Then add a few drops the orange essential oil. (I added about 5 drops) (I also added it to the water, but I'm not so sure it's a good idea...)

4. Let it brew.

5. Then add ice to a glass and pour the coffee. Then add half & half to your preference. Then I add stevia, but whatever you prefer.  

If you really want to outdo yourself, you could make homemade whipped cream sweetened with whatever you like, and candied oranges too! Add the candied oranges to your coffee. Then add a dollop of the whipped cream and a sprinkle of cinnamon! Yum!!! 

Hope you do try this at home! Love y'all!!! -Ryn

P.s. You're not going to like what I'm about say but it will be to your benefit! I'm going to hold off on doing DIY Fridays for a few weeks : / it's just super busy right now and I haven't been able to put a whole lot of time, effort & heart towards it. So, I'm taking a few weeks off starting next week and hopefully get some DIYs going again soon! I'll let you know when I'm back in action on here & on Instagram! (Username: @RynB) thanks y'all for understanding! Hope you have a fabulous week! 

October 11, 2013

DIY Friday: lip scrub

I love how soft my lips feel & look when I use a lip scrub. I've wanted to try the Fresh lip scrub, but I know they add things that I don't really want on my lips... Like preservatives, chemicals, etc! But this way I know what's going in the scrub and on my lips! Plus, this is budget & wallet friendly! Where as the Fresh scrub is $24 for a small pot... Ouch! 

Here is what you'll need:
-Organic sugar
-Coconut oil (in the winter time it will turn into a solid mass, but you can still use it!)
-Essential oil (I used peppermint, but you can use any scent.)

Put the sugar into the bowl, I used about 1/4 cup. But you can use more if you'd like.
Then add about 2 tablespoons of coconut oil. If it is solid, I would heat it before adding it to the sugar.
Stir it and see if it's the right consistency, if not you'll want to add a touch more of sugar. 
Then add the essential oil of your choice. I added 3 drops, I would say you can add up to 5 drops if you would like.
Then stir it all up! And you now have an awesome lip scrub! That costed maybe $3, if that!  

Perfect for using before applying matte or highly pigmented lipsticks. Also this great for gifts for Christmas, birthdays, or hostess gifts! 

How to apply the lip scrub:
1. Put a dime size of scrub on your forefinger & middle finger. 
2. Place it on you lips and swirl/scruff off the dead skin. Open your mouth and stretch your lips, to get between the wrinkles in your lips.
3. Then use a wash cloth to remove the excess sugar and dead skin. 
4. Apply your lipstick! 

Remember, this scrub will actually plump your lips! And drinking enough water will too! 
Hope you try this & happy Friday! -Ryn

September 27, 2013

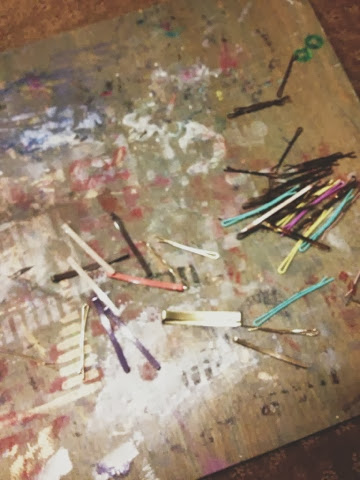
DIY Friday: colorful bobby pins

So, I haven't been using too many bobby pins lately... But now I might! These remind me of Kate Spade a lil bit! And they are adorable in your locks!

 These are so cute and super simple to do! 

What you'll need:
Bobby pins (I used the fatter ones, but try the skinny ones, it may work!)
A sheet of paper (or a catalog... Thank Mackenzie-Childs!)
Nailpolish (I know I used my Butter London...)
Topcoat

-BEFORE-

Polishes I used: 
Butter London; Wallis, Shag & Rosie lee
Savina; blue for you, dream & envy
Opi; gift of gold
( I must say the glitters are totally my favorite!)

-AFTER-


1. Get the bobby pins, slide them onto the sheet of paper.

2. Use your polish, and polish the bobby pins. 

3. Use topcoat to seal it.

4. Let dry. 

5.Ta-da!!!! You now have fancy bobby pins to pin back your beautiful do! 😄

Hope you enjoy and happy Friday! -Ryn

September 13, 2013

DIY Friday: Attention

Hey loves! I hope all is well in your corners of the world, wherever that may be! : ) 

I have some disappointing news for ya, I will not be uploading a DIY today! : ( 
But I will try and get one up next week! : ) 

Because I'm helping my mama with an event she's planning, I have put everything pretty much on hold until next week so I can give her most of my attention! I will be back in the swing of things starting Wednesday! 

I do want to say, I have been watching fashion week online and so far Rachel Zoe & Nicole Miller are my two faves right now! Haven't watched them all yet, but when I do I'll let you know who really is/are my favorite(s)! And if you'd like to watch too, go to: www.newyorkfashionweek.com. It's quite enjoyable! : )

Also I have been thinking about starting a new miniseries of blogposts, which I would upload on Thursday. I would call it Thankful Thursday, just to get into the spirit of thanksgiving and all that jazz! I would say what I'm thankful for and explain why I'm so thankful for it! I would start the first Thursday of October... What do y'all think? Something I should do? Or not? I would love for y'all to join in and comment or email me with what you're thankful for too! 

Also still available to style you! Just email me with what you would like me to do! 

If you have any suggestions for the blog, or have a question for me, or would like to get a hold of me, please contact me via email: styledbyryn@gmail.com

Thanks y'all! Love ya, Ryn

September 6, 2013

DIY Friday: printed cuffs

Hey y'all! So today I'm styling a couple and shopping for their new stage wardrobe! Super excited! 

I also have a new DIY for you! Super easy. Super cute for all sorts of outfits! 

What you'll need:
Stencil
Stamp 
Jacquard paint
Foam brush
Jeans
Iron

1. Grab your jeans.

2. Turn them inside out.

3. Lay them on a flat surface.


4. Stamp your design onto your jeans. I stamped from ankle, 12inches up. 

5. To Overlap design, Lay stencil on your stamped pattern, and add paint to stencil. 


6. Then lay paper towels on each pant leg, and repeat the same process that you did with the front of the leg. 

7. Hang to dry for 24hrs.

8.  Then set your iron to the highest setting, and if you have a steam setting use it. You want to iron the paint to heat set it, so the paint will not fade. 

9. Turn right side out. Then cuff your jeans & explore the possibilities of outfits! 


Ta-da!!!! And then they are complete! Super cute detailing! 

Enjoy and do something fun this week end! -Ryn

August 30, 2013

DIY Friday: watercolor notecards


I must admit these were one of the funnest DIY's to make! They are just what I wanted. I've always wanted to try painting watercolor, but never have had the chance, this rendition of watercolor. :) 

These remind me of some plates I bought at anthropologie a few years ago. They are paint by numbers but then water colored over it. (If that makes sense) They are still my favorite plates. 

But I love hands-on projects because they're just so much fun! And I don't mind getting my hands dirty. (My favorite subject in school was science because it was hands-on! Just and FYI!)  


This DIY is so easy, so artsy and so fancy, you may not want to write a note on it, but give a whole set to a friend or hostess at a party or frame them and hang them on your wall. The great thing is you get to change! 


Disclaimer: I am not saying I'm an watercolor artist at all! I just really like art in all forms.


Here is how you make them-

What you'll need: 
Paper plate
Glass of water
A pack of blank cards in brown paper or white. (I bought mine at hobby lobby for $4.99, but probably got it on sale for 50% off)
Watercolor paints
Art Brushes


1. Grab your art board or in this case, a priority box! Hah!  

2. And these are the cards I used.

3. I've had this set for forever! Some of the colors were even hardened : (

4. Grab a glass and fill it with water. The paint won't adhere to the glass. 

5. The paintbrushes I used. My favorite was the horsehair. It gave it a dry brush look.

6. Put your desired colors on your plate. 

7. Then dip your paintbrush in the water, then in the paint and then on the card.


8. Then paint whatever you you desire! That's the fun of it all, you can imagine it and paint it! 


Have fun with this project! I know I did! : )
Happy Friday & I hope you have a lovely Labor Day weekend! ( and if you or someone you know who served in the military is reading this, I want to say a huge THANK YOU to you! You have impacted my life, and protected it too! For that I am so grateful! Thank you again!) 


Love you all! -Ryn


August 23, 2013

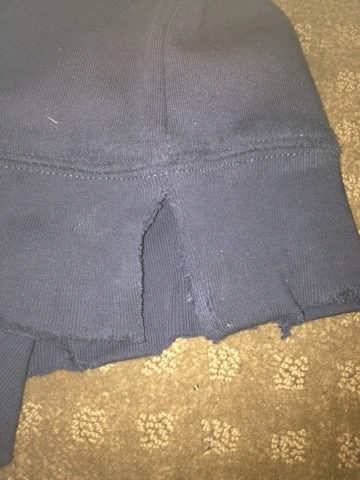
DIY Friday: distressed & studded sweatshirt

So I'm liking the rocker feel lately... And this is the perfect example too.  It's edgy but you can balance it by pairing it with feminine items. Say, a flowy skirt or wideleg floral pants or printed haram-esque pants. Also a body con pencil skirt would work too! 

This is the perfect DIY if, you too like the Edgy look.

What you'll need:
Studs (I bought mine at hobby lobby in the leather making area)
Raglan sleeve Sweatshirt (again I bought this at H&M in the men's section)
Sandpaper 
Scissors 

1. (This was me trying to lay the sweatshirt out flat. Thank you Graycie!)
You'll want to lay the sweatshirt out flat. Minus the dog.


2. Lay you studs out.


3. Grab one of the shoulders of the sweatshirt & grab one stud. And place the stud over the the raglan seam on shoulder on the front of shoulder.


4. Poke the stud the through the sweatshirt. Once it's gone through, use your scissors to bends the tines, as if the stud & tines are hugging the sweatshirt.


5. Repeat this process until you reach the armpit seam. (I did not run it around the whole arm, just the front.) 


Then repeat to the out her side: 

6.Next, use your scissors to cut holes in the ribbing on the hip, arm cuffs & neckline. Sizes of holes should vary. Start stretching the holes. 


7. Use your sandpaper on the holes you just cut. 

8. Stretch out the ribbing and sweatshirt as much as possible. You want a worn in feel. 

9. Then I slit the hip ribbing on sides and stretched those aswell. Then I sandpapered them. 

10. I Will warn you, once you use the sandpaper, the sandpaper will great holes, so don't freak out if you have more holes. It just adds more character to your sweatshirt. 

Now for the styling: I see a black bodycon pencil skirt, with an off-white chiffon collared shirt, this navy sweatshirt and black pointy toed flats or heels & a brightly colored cross body bag in pink or highlighter yellow. 

So, here ya are! I hope you try this DIY! Happy Friday! -Ryn